Archive for the ‘Citrix’ Category
Bring Your Own Device (BYOD) with Hyper-V and Citrix
During last week’s System Center Universe Asia Pacific, there was a question raised during the Ask the Experts portion on how Microsoft can address BYOD while ensuring that corporate security is still maintained, the Experts in the panel were not really able to address the required architecture.
I was formerly connected with Citrix, and right there I immediately thought of Citrix XenDesktop. However being in a Microsoft event I decided to keep my mouth shut and just decided to share the solution by writing about it. So here it is!

Bring Your Own Device (BYOD) Architecture
The solution is to allow the personal devices to connect to VMs. These VMs are connected to the corporate network, while the personal devices are in some sort of protected network which is separate from the corporate network, and is only allowed to use the protocols necessary to allow the client to connect to the VMs.
Since the solution requires VMs. using Hyper-V is the way to go. No discussion here.
For this solution to work, there must be some technology that does VM provisioning. This is where the Citrix XenDesktop product comes in. You can dynamically provision VMs as needed.
The VMs can be shared VMs deployed with the same apps, or app deployment can be performed dynamically as the VM is being provisioned using either Citrix XenApp, or using Configuration Manager.
Just to be sure, some sort of health checking is prudent before the personal devices can be connected to the personal devices network. Also, they have to be enrolled to allow for authentication and encryption.
So does this solution work? Yes it does, and one great experience I had with Citrix is that BYOD and non domain joined devices are the norm!

Running Windows 8 on an iPad Mini with Citrix XenDesktop.
Configuring Citrix AppDNA 6.3 Integration with Microsoft App-V Sequencer 5.0
This video explains how to configure Citrix AppDNA 6.3 to create a Microsoft App-V Sequence using App-V 5 Sequencer.
Citrix AppDNA will be in the Microsoft Community Technology Update 2013!
This 27th July 2013, I will share with the Microsoft Singapore technical community how our technology AppDNA 6.3 can help accelerate the migration out of Windows XP, given that XP end of life is slated April 2014.
Details and registration can be found here. See you!
Demistifying Citrix AppDNA Forward Path and Task Sequences
One of the more interesting features of Citrix AppDNA application compatibility software is Forward Path. Not only can one customize the logic and really go beyond what AppDNA provides out of the box, but on top of that assign certain actions based on the results.
What makes Forward Path so mysterious to some (aside from the required scripting skills), is that to be able to appreciate its full potential, one must make several components of AppDNA work together harmoniously. Simply put, Forward Path logic is simply a set of conditions based on results of one or more of the AppDNA algorithms, and assigns either a RAG value, or an Outcome value or both. But Forward Path can be more than just providing a report, because one can assign Task Sequences based on Outcomes, say if the application is OK for App-V, then proceed in making an App-V Sequence, and if the application is OK for Windows 8, then use a third party packager to create a .MSI package for later deployment in your XenDesktop infrastructure. Or if it’s ok for XenApp, then create a .MSI package specific to Windows Server 2008 R2 so that all XenApp servers will use the same .MSI file during installation, ensuring uniformity across all XenApp servers. The possibilities are only limited by your imagination — and scripting skills!
Let’s now strip away all the mystery.
Before we dig into the details, let’s step back for a minute and get a bird’s eye view of the entire picture of Forward Path The illustration below best provides a high level idea of Forward Path and the different AppDNA components it works on:
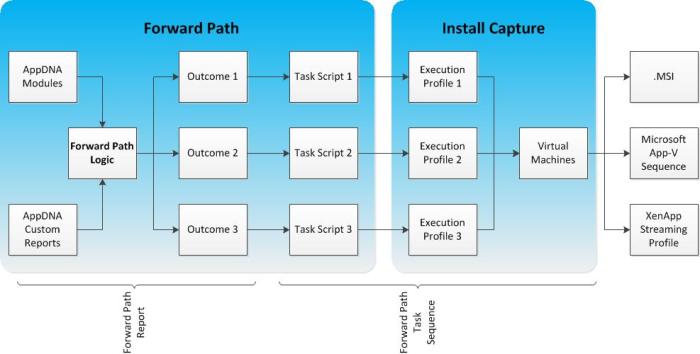
Forward Path in a nutshell
As the illustration shows, there are items that we configure under Forward Path, and there would be items that we configure under Install Capture. This is where a newbie would be lost, especially if we’re not in the habit of RTFM (“Read the fluffy manual,” which most techies are guilty of), until we get lost and search what we did wrong.
Forward Path can be divided into two parts: Forward Path that results in the Report, and Forward Path that proceeds to create packages via Task Sequences. The second part requires knowledge in working with the Install Capture portion of AppDNA. Key things to remember are as follows:
Forward Path Report
- Forward Path Logic is a set of conditions. Don’t panic, because out of the box, AppDNA includes very useful logic which we can use as is, or make minor modifications to the code.
- These conditions are based on RAG values of the AppDNA Modules or Custom Reports
- Forward Path Logic results in a set of Outcomes
So out of the box, we can already produce the Forward Path report similar to the illustration below:
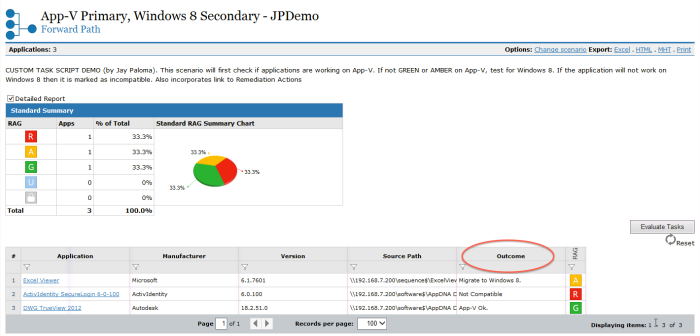
The Forward Path report
But if we want Forward Path to perform tasks in addition to creating the Forward Path Report, we will proceed as follows:
Forward Path Task Sequence
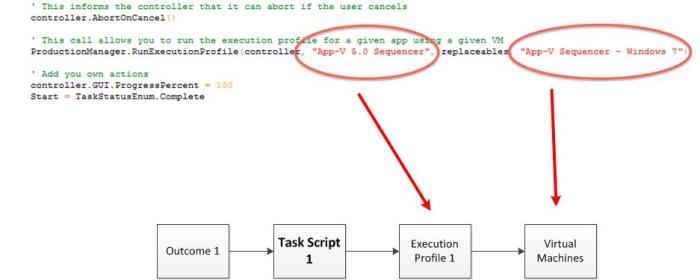
- Each Outcome is then assigned a Task Script
- The Task Scripts call the Virtual Machine and an Execution Profile. The Virtual Machine in this context is a VM configured in AppDNA which refers to an actual VM running in a hypervisor. Setting that up would be another story, maybe a future blog post or video from yours truly.
- The Execution Profile does the following: calls a third party .MSI packager to create a package, run the Microsoft App-V Sequencer to create an App-V Sequence, or run the XenApp Streaming Profiler to create an application streaming profile, and more depending on one’s scripting skills and what needs to be done.
Forward Path Logic
In its simplicity, the core of the Forward Path logic is a set of conditions generally based on the different testing modules available in AppDNA. Below is a typical Forward Path logic:
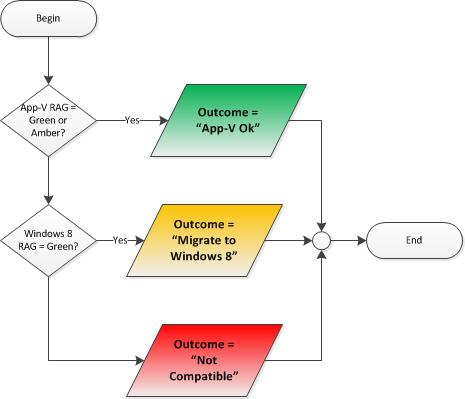
Sample forward Path logic flowchart
The example in this illustration indicates that if the App-V RAG is Green or Amber, then assign “App-V Ok” to Outcome, and other values depending on Windows 8 RAG. That simple (there are additional conditions further down the script but for purposes of this discussion, let’s keep it simple)! This portion gets more complicated the more – and deeper – conditions are applied. But to describe it in one line, the Forward Path Logic is simply: assign a specific value to Outcome based on the RAG value(s) of one or more Modules.
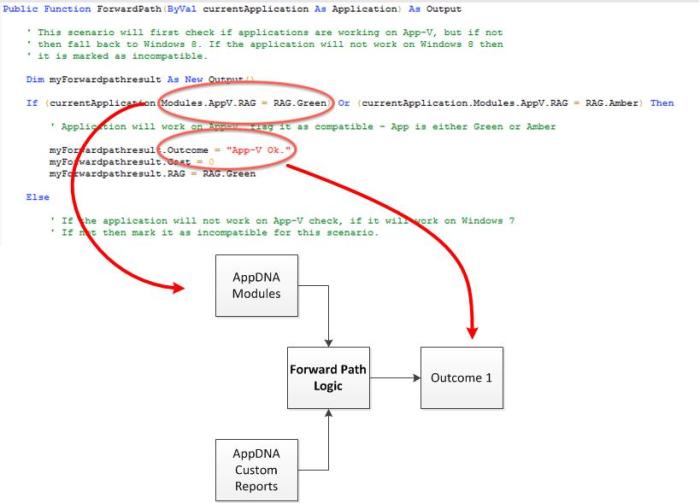
Snippet of the Forward Path logic
Task Scripts
Each Outcome value can now be assigned its corresponding Task Script. This Task Script actually calls two things that were created under Install Capture: the Virtual Machine and an associated Execution Profile (what the VM will do once it fires up). In this example, the Task Script fires up a Virtual Machine called App-V Sequencer – Windows 7 and runs the App-V 5.0 Sequencer Execution Profile. The App-V 5.0 Sequencer Execution Profile is built into AppDNA. Meanwhile the App-V Sequencer – Windows 7 VM is a Windows 7 VM that has the Microsoft App-V 5.0 Sequencer installed. If run properly, the result is an App-V 5 sequence of the application.
Task script code snippet
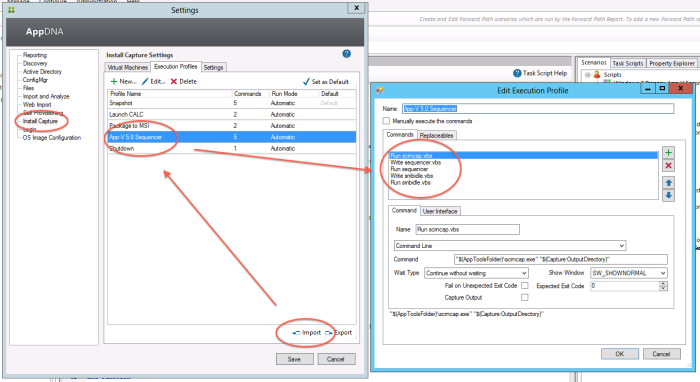
Creating Virtual Machines and Execution Profiles in Install Capture
I created a Windows 7 VM with the App-V 5 Sequencer installed, and then configured this VM as a VM in AppDNA. Note that one needs to be familiar with how to create an Install Capture VM in AppDNA to be able to do this.
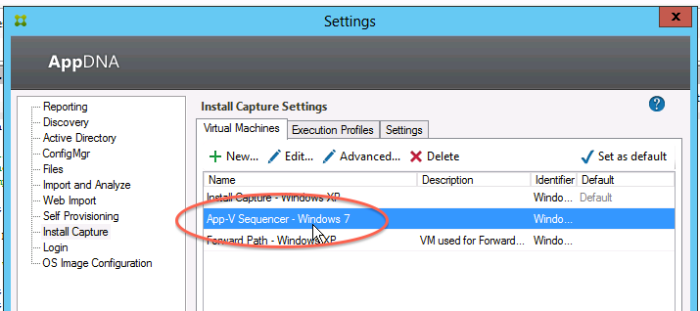
Virtual Machine configuration in AppDNA.
Both the Virtual Machine and Execution Profile are created in Install Capture, under Edit menu > Settings. Meanwhile, the App-V 5.0 Sequencer Execution Profile is part of the AppDNA package; we just need to import it. I did not have to edit anything in the App-V 5.0 Sequencer Execution Profile. However, you are free to create your own Execution Profile that, say, launches your organization’s .MSI packager and creates the .MSI package of the application with its corresponding transform files.
Execution Profile configuration in AppDNA
Go try out this very interesting feature and see the power of Citrix AppDNA! Download your FREE copy of Citrix AppDNA from http://www.citrix.com/products/appdna/overview.html. This free version is a fully functional copy of Citrix AppDNA that allows for UNLIMITED application imports, and detailed remediation reports for 5 applications.
Top 10 Application Compatibility Issues that still affect Windows XP to Windows 8 Migration
 April 8, 2014 marks the end of Windows XP Support. According to Microsoft:
It means you should take action. After April 8, 2014, there will be no new security updates, non-security hotfixes, free or paid assisted support options or online technical content updates.
One of the first things you will do to address your Windows XP to Windows 8 Migration is to test your current applications for compatibility to the planned new Windows client platform. I have compiled a list of the Top 10 Issues that will, and still, affect Windows 8 deployment in your organization. I used Citrix AppDNA 6.3 Application Compatibility Software to gather information based on 35 randomly selected apps that run on Windows XP. Note that I have deliberately omitted the remediation actions for most of these issues, and only included those commonly known and obvious ones.
These issues don’t just affect migration to a new Windows client platform. Companies currently on Windows XP and are deploying Citrix XenApp or Citrix XenDesktop will sooner or later encounter these issues, and more. For XenApp 6.5, we need to ensure that the application runs on Windows Server 2008 R2 (which is 64-bit adding another layer of compatibility issues not addressed in this article), as well as have the ability to run in a remote desktop/TS capacity. For XenDesktop, we need to consider that the application should be able to run on the target Windows platform that will be used and if this platform will be 64-bit.
And here they are:
# 10 – .NET 3.5 Framework Dependency
.NET 3.5 Framework is not available in Windows 8 by default, and applications that require this will not be installed, or if installed successfully, not function on Windows 8 unless installed prior to the application or is redistributed with the application installer.
For more information, check out this MSDN article .NET Framework 4.5 is default and .NET 3.5 is optional http://msdn.microsoft.com/en-us/library/windows/desktop/hh848079(v=vs.85).aspx
# 9 – VideoPortInt10
The VideoPortInt10 function performs the equivalent of the MS-DOS INT10 function. Some legacy drivers use this function to communicate with the system BIOS for example, to change the video mode. This is no longer supported in the Windows 8 Device Driver Model (WDDM).
# 8 – Attempting to access protected registry keys
During installation, some applications designed for Windows XP attempt to write to certain registry keys that are already protected in Windows 8. Only installers with the TrustedInstaller status can write to these protected locations, but this is limited to certain Microsoft installers like Windows Update.
Elevating privileges may provide a quick remedy to this issue, but ensure that UAC prompts are suppressed as well.
# 7 – Session 0 Isolation: installing an interactive service
In Windows XP and earlier, Windows services and applications run in the same session as the one who first logged into Windows XP. This is called Session 0, and services and applications running together in the same session poses a serious security risk since services run with elevated privileges while user apps run with the user security context. These services become targets for malicious code that intends to hijack them to gain their elevated privileges. In Windows Vista onwards, only the services are allowed to run in Session 0, and user applications run in subsequent sessions, e.g., Session 1, Session 2, etc.
The problem therein lies when a supposedly interactive application running as a service (running in Session 0) presents a UI to its user. The user will not be able to see the UI he/she does not have access to Session 0. The application would appear as hanged because it will indefinitely wait for the user reply which will never come because the user did not see the prompt.
More information on Session 0 can be found in this MSDN article Session 0 Isolation http://blogs.windows.com/windows/archive/b/developers/archive/2009/10/01/session-0-isolation.aspx
# 6 – Unsigned Kernel Mode Drivers
In Windows 8 Secure Boot feature enabled as well as 64-bit implementations, the kernel is locked preventing malware to be introduced via rootkits attempting to go around Windows OS security requirements. This affects kernel mode drivers, not user mode drivers.
To be able to properly function, kernel mode drivers need to support the Unified Extensible Firmware Interface (UEFI) Secure Boot, which mandates that kernel mode drivers be signed by a trusted certification authority (CA).
More information can be found in this MSDN article http://msdn.microsoft.com/en-us/library/windows/desktop/hh848062(v=vs.85).aspx
# 5 – Operating System Version prevents installation launch
The installation routine/MSI package will not install because it indicated a launch condition that requires one or more Windows versions which do not include Windows 8. The simple solution to this issue is the Version Lie shim or modify the installation to remove the OS version checking. Though the remediation is simple, this issue is still a Red because application installation will not continue until remediation is performed.
# 4 – User Account Control: Custom Action in MSI launches known administrative executable
Microsoft Installer (MSI) packages always run in the System context with administrative privileges that allow them to install apps, make changes to registry, etc. However, any custom action that the MSI launches does not inherit those privileges, and will fail during launch.
# 3 – User Account Control: Calling Windows administrative functions without requesting administrative privileges
We really love UAC so much that we have two of them! Calling administrative functions will cause UAC to prompt even though we may already be logged on with administrative credentials. If not logged on with administrative credentials, then UAC will prompt for administrative credentials. Either way UAC will still prompt, and since Windows XP does not have UAC yet, an application written for Windows XP is therefore not designed to handle UAC prompts.
For more information on User Account Control, go to http://msdn.microsoft.com/en-us/library/bb530410.aspx
# 2 – Setting the Color Depth
The Desktop Windows Manager (DWM), previously known as the Desktop Compositing Engine (DCE) is used in desktop composition. In Windows Vista and Windows 7, only themes utilizing AERO Glass use DWM, thereby only these themes can use experiences that use desktop composition like Windows Flip, thumbnail view, etc. In Windows 8, desktop composition is available for all themes to simplify coding. DWM requires that color depth set to 32 bits per pixel, and any application calling APIs that attempt to change this will not work as expected.
For more information on the Desktop Windows Manager, check out this MSDN article Desktop Windows Manager is always on http://msdn.microsoft.com/en-us/library/windows/desktop/hh848042(v=vs.85).aspx
# 1 – GINA
Well, she’s still there, and we did choose applications that run on Windows XP didn’t we? Even though the Graphical Identification and Authentication (GINA) and its corresponding APIs had been deprecated since Windows Vista, organizations that still have a high usage of Windows XP may rely on applications that provide authentication services like Single Sign On, or applications that authenticate from the Windows logon that run on Windows XP. As such they require GINA, and these applications will not run or may behave differently on Windows 8.
Applying a shim, even though it may be available, may not provide the expected outcome since the shim will just ignore any GINA API calls. I mean, authentication is a must for the application to run, right? Ignore authentication, and the application will wait forever until authentication and subsequent authorization is addressed.
Personally, if it’s an SSO or an application that customizes/uses the Windows logon dialog box to authenticate, I don’t bother testing at all. Warning though: don’t mistake GINA (key: it involves the logon UI) with apps that rely on Kerberos or NTLM to authenticate. Because these may run, but their ultimate outcome depends on whether you Active Directory infrastructure is properly configured or if NTLM is still in use should the app require it.
Go try!
Go try out this very interesting feature and see the power of Citrix AppDNA! Download your FREE copy of Citrix AppDNA from http://www.citrix.com/products/appdna/overview.html. This free version is a fully functional copy of Citrix AppDNA that allows for UNLIMITED application imports, and detailed remediation reports for 5 applications.
Impromptu Tech Sharing Session with PHIWUG
I spent the week of July 9, 2013 in my hometown of Makati City in Manila, Philippines for a barrage of customer and partner events. Just when my weekend was about to begin during the Friday evening, I still have one more technical session to attend: that with the movers/leads of the Philippine Windows Users Group (PHIWUG). This was held at the Palawan Room of the Microsoft Philippines offices in Makati City.
During this impromptu technical sharing, i talked about Citrix AppDNA and how it can help customers accelerate their migration out of Windows XP, given that Microsoft will end its support on April 2014. MVP John Delizo talked about Office 365. Meanwhile two guests, Chester Coronel, former MVP and currently an employee of Microsoft (which explains why he is a former MVP) talked about Windows 8.1.
We also planned for MVP Jay-R Barrios to do a whiteboard session on Windows client deployment. We planned for an online session because although he was in Manila, he cannot make it to Microsoft Philippines offices. Unfortunately the network connection was too slow for a video+audio presentation.
On top of the technical discussions were also organizational ones as well as planned event in the future, as well as the usual chatter.

Citrix AppDNA Effort Calculator
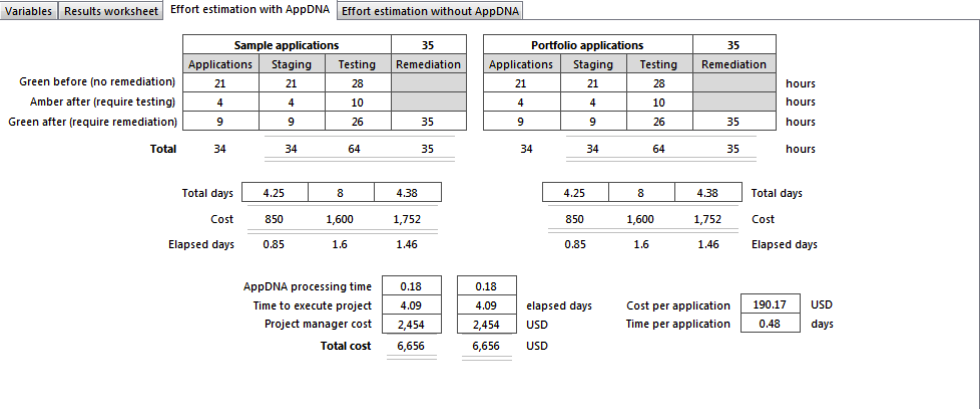
Let’s now take a look at one of the features that comes free with Citrix AppDNA 6.3 Application Compatibility Software. The AppDNA Effort Calculator is used to estimate the time, cost and effort required to move over your application portfolio into the new platform. You can customize certain variables, for example, salaries of testers, to see to it that your effort calculator produces results that are aligned to your business.

The free 30-day trial of Citrix AppDNA that you can download from http://www.citrix.com/AppDNA comes with unlimited imports and a 5-application license. The ability to import an indefinite number of applications means that Effort Calculator would have more data to work with, giving out more accurate results. The more apps you import, the more accurate the results of Effort Calculator.
Let’s now take a look at Effort Calculator.
Before Remediation shows you the current state of your applications
After Remediation shows you the most likely state after you’ve applied all the fixes and recommendations by AppDNA.
Variables tab
General Variables. You can change the company name, currency, and working hours per day and per month. Make sure you indicate the total number of your apps in Number of applications in the full portfolio so the result will be more accurate. The closer this figure is to the number of apps you imported into AppDNA, the more accurate your Effort Calculator results would be.
Without AppDNA Variables. These are variables pertaining to scenarios where AppDNA will not be used. You may enter estimates here of leave it in default values.
With AppDNA Variables. Here you can edit variables pertaining to compatibility testing with AppDNA. Depending on your portfolio, enter the percentage of MSI apps. It takes a lot less time in AppDNA to process MSI compared to non-MSI apps. Also place in the total cost of acquiring AppDNA.
Staffing Variables. Here you customize variables that pertain to staffing and rates. Edit as appropriate.
Results Worksheet tab.
This tab breaks down testing times based on application complexity as well as complexity of remediation.

Effort Estimation with AppDNA and Effort Estimation without AppDNA tabs.
These two tabs detail how the calculations came about, comparing between not using AppDNA and using AppDNA for remediation.

Export.
After everything has been properly customized, you can export the report into a Microsoft Word document. This is the likely end-result of the entire Effort Calculator exercise since more a deeper explanation as well as assumptions are made available in this document.
Download your free 30-day trial of Citrix AppDNA from http://www.citrix.com/AppDNA, and import your applications. When analyzing ensure that you manually unlock licenses so as not to consume the 5 licenses that comes free. After analyzing, the AppDNA Effort Calculator feature is available at your disposal.
The Non-Developer’s Survival Guide to Citrix AppDNA Forward Path
I will lay down the cards to you straight: I am not a developer. However since the AppDNA Forward Path feature requires some scripting and coding knowledge, someone who will be handling the organization’s AppDNA tool should learn some scripting for that person to appreciate the power and flexibility of Citrix AppDNA.
Don’t get me wrong: developer knowledge is not a prerequisite for Citrix AppDNA, since one could already import apps and generate reports without scripting. However, if you intend to make use of the Forward Path feature, one cannot avoid having some practical knowledge and experience of scripting. If you are an IT Professional with very limited coding or scripting knowledge, read on!
AppDNA Forward Path
Forward Path is a business decision tool built into AppDNA where it is possible to create a model of different deployment scenarios and compare their results. Different scenarios can be created that reflect the organization’s deployment strategies, and even execute certain tasks based on the results.
The definition alone is a dead-giveaway: this feature is something that one customizes to make the best use of it — and customizing this means creating scripts. Although there are default scripts included in AppDNA, it would be safe to assume that sooner or later one would require customizations over and above what has been included out of the box.
Surviving Your First Forward Path Script
If you’re a non-developer, the best way to scare you off from going any further is to take a look at the default scenarios.

Though it may be enough to scare off folks who avoid scripting like the plague, it is these very scripts that a non-dev may actually take a look at to get an idea what Forward Path is all about. These and the fact that creating a new scenario gives you a basic — though useless — code to work off from. We will create our own custom Forward Path scenario to find out.
Let’s now customize AppDNA Forward Path. Forward Path can be accessed from the Configure menu item, then click Forward Path. Click the New Scenario, and you will be prompted for details. Since this will be your first one, and maybe even your first experience at scripting, feel free to have your own version of Hello World!

After we hit OK, we will now be presented not with a blank screen, but a basic Forward Path script. Now for all intents and purposes this script does not do anything practical. However, this will be a good starting point for us to understand the basics of Forward Path scripting. This saves the non-developer the trouble of writing all that header information.

Click Test to determine what this script does.

If you look closer, the code simply populated the columns Outcome, Rag and Cost with identical values. As you can see in Line 8 of the code the Rag column has been hardcoded to Green.
Now let’s replace Line 8 with the RAG result of the 64-bit Module instead of a hardcoded “Green.” To do this we will need the currentApplication object. Here is where the Property Explorer would come in handy for us to familiarize with the object model of Forward Path. From this point forward, it is assumed that the 64-bit Module is Enabled and applications had been analyzed for 64-bit.
Replace line 8 with the following line:
myForwardpathresult.RAG = currentApplication.Modules.x64.RAG
Click Test to see the results. As we can see, the Rag column now contains the RAG results of the 64-bit Module.

Let’s now add some logic into our code. Click the Editor tab and add the following lines from Line 10
If (currentApplication.Modules.x64.RAG = RAG.Green) Then
myForwardpathresult.Outcome = “OK for 64-bit”
Else
If (currentApplication.Modules.x64.RAG = RAG.Amber) Then
myForwardpathresult.Outcome = “Have 64-bit issues”
Else
myForwardpathresult.Outcome = “Not good for 64-bit”
End If
End If
This piece of code indicates the Outcome column as “OK for 64-bit” if the RAG result is Green, “Have 64-bit issues” when the RAG result is Amber, and “Not good for 64-bit” if the RAG result is Red.
And click Test to see the result.

Try examining the Property Explorer and you will find out some of the other things you can do. You can customize your own sets of conditions based on RAG results of different tests, or even customize actions that are based on results of these tests.

For more information on Citrix AppDNA, go to http://www.citrix.com/AppDNA. If you haven’t done so, make sure to register and download the free evaluation copy of AppDNA from http://www.citrix.com/AppDNA/try. Also download the AppDNA Forward Path Planning Guide in PDF form here http://support.citrix.com/article/CTX133842.

